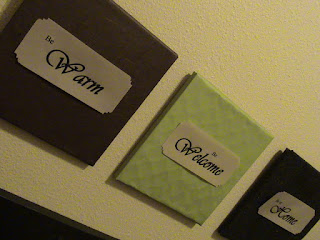
I was at Kohl's a few months back and saw this cute decor that I thought would be great in my entry way:
I don't remember exactly how much it was, but after poking around on Pintrest, I knew I could probably do it cheaper. Here's how mine turned out:
You can't see the detail on the squares, but there is some texture, some color and it adds a great feeling to the entryway. And my 3 squares cost me less than $3 (I don't remember exactly how much I paid for the scrapbook paper, but that's all that I bought).
I used cardboard that came in my mom's Creative Memories scrapbooks (Thanks Mom!) - each piece was 12"x12" and about 1/2" thick. I cut them down to 8"x8". I took my12x12 sheets of scrapbook paper and a little Modge podge to adhere them to the squares. Once that dried, I folded them as nicely as I could and taped them down. Then I found a font in Microsoft Word that I liked, typed up the sayings, and printed them out on a piece of vellum paper that I already had in my stash. I trimmed them and used fancy edge scissors to trim the corners. Using adhesive for vellum, I attached them to the squares. To hang my decor, I saw a tip about using pop can tabs as hangers... so I got out my hot glue gun and stuck one on the back of each square.
I also liked the idea of dressing up the wall a bit more from a post I saw here. So thanks to my Daddy, a free piece of wood left in our house from the previous owners and $6 for 6 drawer knobs I bought at Lowe's, I now have some extra coat hooks in the entry too!
A place for us to share what is happening in our family, thoughts we have, things we do and ways we work together. We also hope to share what we've learned through our Shaklee business to help others have healthier lives.
Tuesday, October 16, 2012
Saturday, October 6, 2012
Transformation: Part 2
What a rough month to try to change how I am eating!!!
September is tough because my birthday and my now 5yo son's birthday are back-to-back. So between birthday parties and various treat email specials we get (I can't say no to Coldstone!), I knew I was doomed.
Added on top of that, one of my best friends was packing and moving far away. Emotional snacking can be another downfall of mine.
I enjoyed our birthday celebrations, trying to have some restraint and I said good-bye to our friends and made some eating mistakes. But I have otherwise tried to stick to the Cinch plan. And each day, I made a conscious decision to keep with it.
I remember when we did Weight Watchers several years ago and during the first 2 weeks I felt hungry all the time. But we stuck with it, and when we started seeing results it wasn't so difficult to keep going. I have had a few days this time where I have wondered if I could stick with it. Yesterday I put on a pair of shorts that were LOOSE! Seeing results, even when I had a rough month, is enough to keep me going!
Woo-hoo!
9/8/12: 154.8 lbs, waist: 35.25 inches, hips: 41 inches
10/6/12: 151.8 lbs, waist: 34.5 inches, hips: 40 inches
Tuesday, October 2, 2012
Gearing up for fall
Thought I'd try a few new things for fall decorating and I loved many of the ideas from Sand and Sisal. They used MDF letters, but I wanted to use things I had on hand - so I cut some letters from cereal boxes. I might use a thicker box if I decide to re-do them, but this worked pretty well. Now that I look back at mine and the example, I might adjust my ribbon lengths, but I used all items I had at home (boxes, ribbon from another project, scrapbook paper, fall leaves from fake flower bouquet and Modge Podge) so this didn't cost me a penny!
I like the topiary from Sand and Sisal too, but while I was at the Dollar Tree, I found some small craft pumpkins and thought I'd try something with them (there are lots of cute ideas on Pintrest, I tried spray paint like Wild Ink but before I spray painted, I did a little decorating with puffy paint...not sure how well it shows up in the pictures, but the only thing I would do different is get a glossy paint for the black one, or add a glossy coat (which I may still do). For now, my little pumpkins are keeping watch on the porch ledge.
I like the topiary from Sand and Sisal too, but while I was at the Dollar Tree, I found some small craft pumpkins and thought I'd try something with them (there are lots of cute ideas on Pintrest, I tried spray paint like Wild Ink but before I spray painted, I did a little decorating with puffy paint...not sure how well it shows up in the pictures, but the only thing I would do different is get a glossy paint for the black one, or add a glossy coat (which I may still do). For now, my little pumpkins are keeping watch on the porch ledge.
Subscribe to:
Posts (Atom)


