Monday, September 30, 2013

Perfect-for-fall-granola!


I have been wanting to try a granola recipe for a while and a friend encouraged me just to pick a few and start trying them.  So, I found one that sounded good.  It had apples in it and I had just bought a bag of Galas at the store and then took an unplanned trip to ApplAcres with a friend, so I have apples galore right now!

Of course, I have the apples, but didn't think about looking up recipes before going to the store last week, so I ended up improvising a bit (I've been getting a little better at it lately!).  Here's the original recipe:


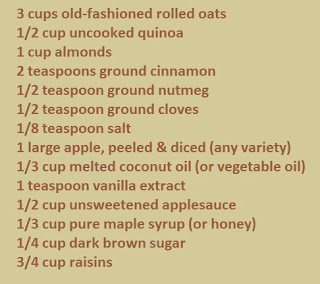
But, I didn't have quinoa, almonds, apple sauce or raisins on hand.  But I did have plenty of oats, pecans, a tiny package of chopped peanuts and some snack boxes of Craisins.  Here's what my final recipe ended up like:


UPDATE: Here are the prep/cooking directions
Preheat oven to 325F degrees.  Line two large baking sheets with silicone baking mats or parchment paper. Set aside.
In a large bowl, toss the oats, quinoa, almonds, cinnamon, nutmeg, cloves, and salt together until combined.  Fold in the dived apple. Set aside.
In a medium bowl, whisk together the oil, vanilla, applesauce, maple syrup, and brown sugar.  Pour over dry ingredients and mix until everything is moistened.  Spread onto two baking sheets and bake for 45 minutes, making sure to stir the granola every 10-15 minutes to prevent burning.  Allow granola to cool for 20 minutes on the baking sheets. This will help it get crunchier. Pour into a large bowl and add the raisins.
Cover tightly and store at room temperature for up to 2 weeks. Granola will lose its crunch overtime because of the apples.
*Make sure your oats are certified gluten free if you have an intolerance. 
*You may use honey, agave, or light corn syrup as the liquid sweetener.  Keep in mind that using honey means your granola is no longer vegan.

Because I didn't have applesauce (yet! going to try a crock-pot recipe soon!) I increased my vegetable oil and honey to replace it. Even with my adjustments, it turned out AWESOME!  And my house smells wonderful on this rainy fall day.  Just perfect!

Here are some pics from our apple-picking fun!
buddies proud of their apples!

now where are those apples...


I can carry them!

me too!

Thursday, March 14, 2013

Is it Spring yet?

It's the middle of March, Spring Break for many (although it was snowing today in Bloomington).  Do you have the itch to open your windows and let in some fresh air?  Me too!  Spring is also a time when many of us do a little "spring cleaning."  But before you do, take a good look at the products that you are using.

The real dirt on clean.
You know that good, healthy feeling you get when you’ve just  cleaned house? Sorry to spoil it, but you may have just made your home dirtier.

Think of it this way. You wouldn’t let your kids play with toxic chemicals, so why would you let the baby crawl over a floor that’s just been wiped with them? That’s much more dangerous than the orange juice that was just there.

How dangerous? Just take a look at these statistics.
  • Over 90% of poison exposures happen at home.
  • Common chlorine bleach is the #1 household chemical involved in poisoning.
  • Organic pollutants, found in many common cleaners and even air fresheners, are found at levels 2 to 5 times higher inside your home than out.
  • A person who spends 15 minutes cleaning scale off shower walls could inhale three times the “acute one-hour exposure limit” for glycol ether-containing products set by the California Office of Environmental Health Hazard Assessment.
  • Common cleaners give off fumes that can potentially increase the risk of kids developing asthma, the most common chronic childhood disease.
  • 1 in 13 school-aged children has asthma. Rates in children under five have increased more than 160% from 1980 – 1994.
  • Children are highly vulnerable to chemical toxicants. Pound for pound of body weight, children drink more water, eat more food, and breathe more air than adults. The implication of this is that children will have substantially heavier exposures than adults to any toxicants that are present in water, food, or air.
  • If your home is anything like the average U.S. home, you generate more than 20 pounds of household hazardous waste each year (the EPA designates toilet cleaners, tub and tile cleaners, oven cleaners, and bleach as hazardous waste).
          ("The Real Dirt on Clean" is a resource of The Shaklee Corporation)


Kyle did HazMat training as a part of his last job - it opened his eyes to the dangers of general cleaning products. There is a special code in the hazardous materials regulations in the US for things that would be classified as hazardous (i.e. toxic, corrosive or things like that) but if they are packaged for consumer consumption, they get a different label. They are classified as “Other Regulated Materials- Domestic” or ORM-D. Walk around your local store when they are stocking cleaners – look at the labels on the boxes. If you see the letters ORM-D on the outer box or a diamond with black and white diagonal striping and the number 9, that cleaner has been shipped as HazMat, and would be classified as flammable, toxic, or corrosive if they had shipped it in a 50 gallon drum. BUT- because they put it in a plastic spray bottle and put a brand name and a label on it, they can ship it under a different code and sell it to you. Would you buy a cleaner for your house if it had a label on it that said “Toxic” and had a skull and crossbones on it? Of course not… yet most of the cleaning products sold in stores have the ORM-D label so that they don’t scare the consumer. So be aware and informed… or use something safer…

Check out our website for a kit to really GET CLEAN in your home!
Kits start at $46.20, retail price, but join now as a member and you can save 15%!

Friday, March 1, 2013

Gettin' Shaggy Wit' it

T-shirt Shag Rug
I attempted my own rug, using t-shirts left over from the quilt my mom & mother-in-law had made for me.  Our boys' bathroom is blue/white, so navy, white & grey worked out pretty well color-wise.

The only problem I saw with this technique is that if I want to throw it in the wash, I may have strips that come out. So my addition to the instructions was to use fabric glue and put a dab under each loop on the back-side.  It was a little time consuming - so if I do it again, I might try sewing this time...

I tested out a sewing technique on a smaller project - a shag hand duster!
 Here's what I did
  • took the back side of an old t-shirt and folded it in half length-wise
  • measure up from the bottom hem about 4 1/2 inches and cut straight across from the unfinished edge to the folded edge - this will make your "pocket"
  • next, cut the remaining folded fabric (from unfinished to folded edge) into strips about 3 inches wide (can be wider or shorter depending on how long you want your shag) - I made 5 strips.
  • unfold your "pocket" and lay flat. take one strip and lay it on top of your pocket so that the lengths match up.  I put my first strip in the center. now sew it down - one pass right down the center (I used a zig-zag stitch, but a straight stitch would be fine too).  Depending on how particular you are, you may want to pin, but I just eyeballed it and held it in place as I went.
  • attach each strip in the same manner, making sure to fold any attached strips out of the way so that you don't tack them down on your sewing pass.
  • once you have your strips sewn on, lay them toward the middle and fold your pocket together along the original fold, so the strips are touching. you are going to sew the long edges, making a kind of small pillow case, with the short unfinished edge open. Again, if you want to pin the edges before sewing, feel free.
  • now, turn your duster inside-out and you are almost done!  this is where you make it "shaggy". go along each strip, cutting straight in toward your stitches, making each shag piece as thick or skinny as you would like. Keep cutting until each strip has been cut and your pocket will begin to look like a shag duster.
  • You can stop here and get right to cleaning. OR, if you want to add a piece of elastic along the inside to hold it on your hand, but a small piece of elastic about the size of your wrist. Pin it in about 4 places, evenly spaced inside your pocket. Sew between each pin, stretching your elastic to match up with your fabric as much as possible.
There you have it! Your own shag duster!

I think this technique would work for the rug as well, you just might need to sew strips closer together to get them to "stand" up a little more. Once your strips are sewn on, sit and cut your shag into it while you watch tv!